


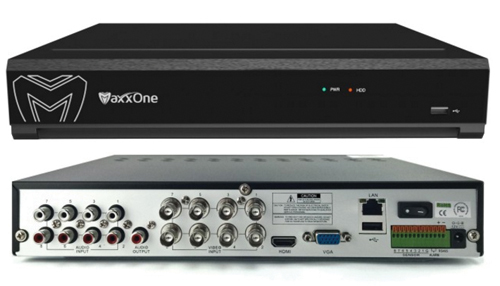
 One of the D8300 range available from ShopMassive in the UK, the D8308 “Hawk” DVR has the capability to record 8 analogue inputs and 4 IP streams. The analogue inputs can be any mix of SD, AHD and TVI format signals.
The Hawk is available as a 4 or 8 input recorder with a capacity of 2 or 4 IP streams in addition to the analogue inputs. If only IP cameras are utilised then a maximum of 6 or 12 streams can be recorded respectively.
Getting started
The DVR was supplied with no hard drive fitted, though the documentation supplied suggests that this will be an option when fully released. Internally the DVR comprises one main board that holds all of the main components, with a small sub-board that attaches to the side of the main board for the RCA/phono audio connectors; 8 input and 1 output on this model. Only one SATA drive connector and power lead is available on the PCB. For the testing, a WD 1TB drive was fitted.
It was noted that there is no fan within the case so one of the newer low power hard drives would be preferred to keep the temperature as low as possible. After over 24 hours of operation temperatures remained relatively low with the three heatsinks between 47° and 54°C and a drive temperature of 37°C at a 26°C ambient.
At power-up the screen gives a MaxxOne ‘splash’ screen display during start-up and then shows a 12 way split camera display. At first use a “Startup Wizard” window is overlaid and a smaller warning window prompted that the new disk was unformatted.
Accepting the warning message takes you to the Password set-up window. This forces you to use a password on the device, but only notifies you after entry that the password must be exactly 8 digits in length. It does not appear to force a complex password but this is advisable.
The ‘Wizard’ process then takes you through formatting the hard drive, Network Configuration, Email Configuration, IP Camera set-up, Record Schedules and then General System Configuration (Time & Date, Language and Video Format). A tick box can be activated to prevent the Wizard from running during subsequent system start-ups.
Software
The disc supplied with the unit has three folders; the first “Mobile documentation” holds a single page ‘App Quickstart Guide.pdf’ and a Readme.txt file. The second is “Software for Mac” holding a ‘MaxxOne CCTV Viewer.dmg’ file and ‘Video Player.dmg’ file. The third folder is “Software for Windows” and this has three sub folders, “AVI Generator” holding ‘AVIGenerator.exe’ and its Readme.txt file, “MaxxOne CCTV Viewer” holding a 45 page ‘Guide.pdf’ client software manual and the MaxxOne CCTV Viewer.exe’ file and finally “Video Player” that holds the ‘Video Player.exe’ file and its Readme.txt.
The AVI generator programme is included to allow conversion of the recorder’s native h.264 file format to AVI for distribution without the need for the Video Player software.
The Video Player software does need to install files on the PC so cannot simply be run from the disc.
Operation
Once set up, the DVR is very straightforward to operate by USB mouse control. Taking the mouse to the bottom of the screen or clicking the right mouse button brings up a series of Icons at the bottom of the screen. These in turn, access the Main Menu, Manually Lock the screen, Select screen display formats, Switch Stream, Review Policy, Mute, Playback and Info.
SD analogue cameras simply plug in and display as expected and AHD and TVI camera feeds are compatible so display directly. The unit does not accept SDI signals but this standard is becoming less common now so should not be an issue.
IP cameras are easily added via the IPC menu option. This, via a Search button will identify any ONVIF conforming cameras on the network’s local subnet and they can be added in. There is a large degree of flexibility for the inputs as the analogue inputs can be individually disabled to allow additional IP camera allocation up to the maximum 12 images that can be recorded.
Display formats are very flexible with Single, Quad, Nine and Twelve way, then an extended set of 1 + 5 (Large to Small), 1 + 7, 2 + 8 and 1 + 9 options. Images can be freely moved around these displays.
Any missing camera positions will display the MaxxOne logo in the relevant window, however, if the analogue channel is disabled, the logo is replaced with the text “No Camera”.
An option to set up to 4 privacy zones per camera is given. In practice, the display window for this function did not present as shown in the manual but a full screen image was forced that allowed the zone to be set but did not return to the settings window. With some re-selection is was possible to save zones but not as smoothly as expected.
Selecting a display window brings up the option icons for that camera; these are Manual Capture, Manual Record, Instant Playback, Zoom, Colour Settings and PTZ. The Instant Playback presents the last 5 minutes of that camera’s recording and while it only has a play and pause capability, the slider allows simple navigation to the potential point of interest.
A ‘Cloud’ storage option is offered for archiving video but this appears to be aligned to the Dropbox service with no mention of other cloud storage providers.
Read the full review in the September 2017 edition of PSI magazine