


 The Vivotek IP8155HP is a 1.3Mpixel IP camera that comes in a box complete with a lens and a bracket and user manual on a CD with a paper quick start guide. This is neither a high definition (1080p) nor a 720p camera. The chip is a one third inch progressive scan CMOS chip with a size of 1280 x 1024 pixels (giving 1.3 megapixels). Note, it is a progressive scan system, this being where the whole image is processed progressively “in one hit”, rather than where the viewed image comprises two interlaced fields of video. It is also neither a 16:9 aspect ratio, nor a 4:3 aspect ratio; it is a 5:4!
It is an IP camera but it also has an analogue output on a BNC, which is fully functional whilst the IP output is active. This can help with lens setup and give the optional output to a local monitor or video switch. It should be noted, however, that there are no specifications associated with the analogue output regarding video levels and sensitivity etc. The analogue resolution measured on a conventional PAL input monitor, was at best 400 TVL. There was also evidence of Moire (see bricks images below).
When you come to setup the camera it is, as now usual, necessary to install the manufacturer specific “Installation Wizard 2” to enable the camera to be detected and added into the recording devices. The detection of cameras is, of course, using the MAC address of the camera to identify all the Vivotek products on the network and you are thus able to change the default IP address of the camera, using this software. Interestingly, the camera does not have a password protection by default.
As with many IP cameras there are two IP streams from the camera one with variable size images and frame rates, with the other set to a default of 640 x 480 for viewing on mobile devices. The settings can be varied in terms of frame size, frame rate and quality. It should be noticed that there is a warning that if fixed quality mode is chosen, at night with the increase of noise in the picture, that the data rate will increase massively to accurately reproduce the noise created.
This camera is rather unusual in that it includes the interesting option of setting the back focus using a defined custom window anywhere within the overall image, thus meaning that you can ignore objects either in front of or behind the position of the “target”, which might cause problems with an autofocus system.
The addition of up to five privacy mask windows is very simple, using the mouse to create the window size and place it, however they strangely suggest that the mask should be “.. at least twice the size of the object (height and width) you want cover.”
The power supply used for testing the camera was a PoE switch. There are connections for either AC or DC power on the terminal blocks on the rear of the camera. It should be noted that the size of the conductors is restricted to what appears to be approximately 20 AWG.
There was a little frustration in trying to set the camera up. The manufacturers CD was used and installed on the laptop on which viewing was carried out. The set-up software tries to find an active internet connection, which in this case it could not. Manual set-up was then carried out. The laptop being used has a Windows XP OS, which was then connected to a 24 port power over the ethernet (PoE) switch and the camera was similarly connected into the switch, creating are very simple network. Having used the Vivotek software, to identify the IP address of the camera, this software was then used to try and set the IP address to a different of “domain”. The process was followed three times, however the IP address would not change. On the fourth attempt, the address changed with no apparent problem and no obvious reason for the first three failures!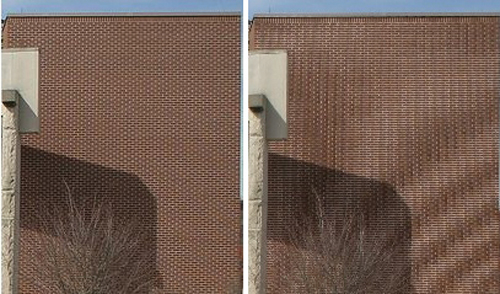
The camera was then viewed in a browser with the default being Internet Explorer. Firefox and Chrome were both tested and there appeared to be no difference in their operation, but do note that QuickTime software is needed as a “plug-in” to be able to view the images. With the data rate set at 8Mbps (maximum) and compression type as H.264 with the largest image size and 25 images per second the latency of our very simple system was just under four seconds.
The overall quality of the images and the production of the hardware was all good. This is a camera that I would quite happily install as an upgrade from analogue to an IP network system, because time could be taken to upgrade the transmission whilst leaving the analogue signalling paths in place and using the analogue output of the camera temporarily. The pdf manual is pretty good in that it is not the usual poorly written, badly worded document. The only real downside to this camera was the hassle experienced during the initial setup of the camera, whilst trying to allocate an IP address.
Score: 7 out of 10